Introduction to Homemade Chocolate Turtles
Why you’ll love homemade chocolate turtles
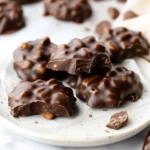
Imagine sinking your teeth into a delicious blend of rich chocolate, crunchy pecans, and sticky caramel. That’s the delight of homemade chocolate turtles! They’re not just a treat for your taste buds; they’re a charming way to impress friends and family at gatherings (or maybe just to indulge yourself on a cozy evening). With the right ingredients and a little patience, you can create these mouthwatering confections that rival any store-bought option. Plus, when you whip them up at home, you can customize your flavors and toppings to suit your personal palate.
Making your own chocolate turtles means you can use high-quality ingredients, free from unnecessary preservatives or artificial flavors. Opting for organic chocolate, fresh nuts, and homemade caramel provides a level of freshness and flavor that’s hard to beat. If you’re on the hunt for a unique gift idea, these chocolates wrapped up in a beautiful box are sure to delight anyone on your list.
The joy of making candy at home
There’s something incredibly rewarding about creating your own sweets. The process of crafting chocolates is not only therapeutic but also offers a unique opportunity to showcase your culinary skills. Have you ever tried making candy from scratch? It can be an exciting adventure in the kitchen!
Let’s not forget the joy of sharing this experience with others, be it friends, family, or even that special someone in your life. Imagine inviting friends over and getting them involved in the thrill of dipping each pecan into silky chocolate, watching their faces light up with the anticipation of tasting something truly special.
Crafting chocolate turtles allows you to bond while creating memories. Plus, you’ll gain a sense of accomplishment when your friends take that first bite and praise your culinary prowess! The best part? Each batch comes with a story—one that’s mingled with laughter, mishaps (like the time I accidentally burned the caramel), and heartfelt conversations.
So roll up your sleeves, grab your ingredients, and get ready to dive into the wonderful world of chocolate turtles! For tips on mastering candy-making techniques, check out Serious Eats. The fun is just beginning; let’s make some chocolate magic!
Ingredients for Homemade Chocolate Turtles
Creating chocolate turtles at home is a delightful endeavor! Understanding your ingredients will ensure your treats are not only flavorful but also visually stunning.
Essential ingredients for chocolate turtles
To whip up a batch of these irresistible confections, you’ll need:
- Pecans: The star nut that provides the signature crunch and nuttiness.
- Caramel: You can use store-bought or make your own—homemade caramel can elevate your turtles to gourmet status.
- Chocolate: Choose high-quality milk or dark chocolate; consider using couverture chocolate for a glossy finish.
These three items form the foundation of your chocolate turtles, but feel free to put your own twist on them.
Optional ingredients for added flair
Looking to shake things up? Here are some optional ingredients to enhance your chocolate turtles:
- Sea salt: A sprinkle on top adds a gorgeous contrast to the sweetness.
- Flavored extracts: Vanilla or almond extract can deepen the flavor profile.
- Dried fruits: Such as cranberries or apricots for a unique, chewy texture.
With these simple ingredients, you’re well on your way to impressing friends and family. If you’re interested in experimenting more, check out this guide on caramel making for some tips! What will you add to your chocolate turtles?
Preparing Homemade Chocolate Turtles
Making chocolate turtles at home can be a delightful experience. These sweet treats combine the rich flavors of chocolate, caramel, and pecans, resulting in a satisfying mix of textures and tastes. If you’re ready to impress your friends and satisfy your sweet tooth, follow these steps to prepare your very own chocolate turtles.
Preheat the oven and prepare your workspace
Before diving into the deliciousness, it’s essential to set up your workspace for efficiency and hygiene. Start by preheating your oven to 350°F (175°C). This will ensure the pecans get nicely toasted, enhancing their flavor.
- Clean your kitchen counter and gather your ingredients: pecans, caramel, and chocolate.
- Lay out parchment paper on a baking sheet. This is where your chocolate turtles will rest and set up perfectly.
Taking a few minutes to prepare can make the process smoother and more enjoyable. Plus, it helps avoid any last-minute scrambling!
Toast and chop the pecans
Pecans are the star of this candy, so let’s give them the attention they deserve! Toasting them brings out their natural oils, intensifying their flavor.
- Spread the pecans evenly on the baking sheet and pop them in the preheated oven for about 5-7 minutes.
- Keep an eye on them; you want them toasted, not burnt!
- Once they’re fragrant and golden, remove them from the oven and allow them to cool.
After cooling, roughly chop them into bite-sized pieces. This not only enhances the texture but also makes it easier to form your clusters later on.
Make the microwave caramel
If you thought making caramel was a chore, think again! For our chocolate turtles, we’re using an easy microwave method that’s quick and reliable.
- In a microwave-safe bowl, combine wrapped caramel candies with a splash of heavy cream (about 2 tablespoons for every 12 pieces of caramel).
- Microwave in 30-second intervals, stirring in between, until smooth and melted. Typically, this should take around 1-2 minutes total.
This simple technique will yield a luscious caramel that’s perfect for drizzling over those pecans.
Form the turtle clusters
Once you have your toasted pecans and velvety caramel ready, it’s time to assemble your chocolate turtles! This part is fun and somewhat resembles art:
- Take a small mound of chopped pecans and shape them into a cluster on your prepared baking sheet.
- Drizzle the melted caramel over the top of the pecans to create that signature turtle look.
- Repeat this process until all the pecans and caramel are used.
Before you know it, you’ll have a delightful assembly of turtle clusters waiting for their chocolate bath!
Melt the chocolate
While your clusters set, it’s time to melt the chocolate. You can choose either milk, dark, or even white chocolate—whatever your heart desires!
- Using a microwave-safe bowl, chop the chocolate into small, uniform pieces to ensure even melting.
- Microwave in 30-second increments, stirring in between to avoid burning. The goal is a smooth and glossy consistency.
For an extra flavor kick, consider mixing in a pinch of salt or a splash of vanilla extract while melting!
Dip and set the chocolate turtles
Finally, it’s time to dip those caramel-laden pecan clusters into the melted chocolate.
- Using a fork, carefully lower each cluster into the melted chocolate, ensuring it’s fully coated.
- Place the dipped chocolate turtles back on the parchment paper to set. For a really nice polished look, you could even sprinkle a pinch of sea salt on top while the chocolate is still warm.
Allow the chocolate to set at room temperature or speed things up by placing them in the fridge. In about 30 minutes to an hour, you’ll have perfectly set homemade chocolate turtles ready to be shared (or kept all to yourself!).
Each step in this process not only helps create delicious treats but also sets the stage for a memorable experience. So why not gather your friends for an evening of chocolate-making? The joy of crafting your own chocolate turtles is a sweet victory in itself!
For more dessert inspiration or tips on chocolate, check out authoritative sources like Serious Eats and The Kitchn for expert advice and mouthwatering recipes. Happy cooking!
Variations on Chocolate Turtles
Chocolate turtles are a beloved treat, but why stop at the classic version? Here are some delightful variations to excite your taste buds and impress your guests.
Sea Salt Caramel Turtles
The combination of sweet and salty can turn an already indulgent confection into something extraordinary. To create sea salt caramel turtles, simply drizzle a pinch of flaky sea salt atop the caramel layer before adding the chocolate. This salty-sweet contrast not only elevates the flavor but also complements the richness of the caramel. For an added gourmet touch, opt for dark caramel for an even deeper flavor profile. According to the National Cattlemen’s Beef Association, ingredients that balance sweet, salty, and rich can significantly enhance the overall taste experience.
Dark Chocolate Turtles
If you’re a fan of bold flavors, consider dark chocolate turtles. Swap out regular chocolate for high-quality dark chocolate, which brings a rich, intense flavor that pairs beautifully with the nutty notes of pecans or walnuts. Dark chocolate also has health benefits, offering antioxidants that lower blood pressure and improve heart health. To make these, simply melt dark chocolate and dip your caramel-coated nut mixture before allowing them to set.
Nut-Free Turtles
For those with nut allergies or sensitivities, creating nut-free turtles is easier than you might think. Instead of nuts, use sunflower seeds or pumpkin seeds for a crunchy texture that holds up well against the buttery caramel. This alternative is not only safe for schools and gatherings but also packs a nutritional punch! Plus, seeds contain healthy fats and protein, making them a heart-smart substitute.
Exploring different variations of chocolate turtles can truly elevate your dessert game! Each twist offers a unique spin, making them perfect for any occasion.
Cooking tips and notes for Chocolate Turtles
Key tips for perfect caramel
Achieving the perfect caramel for your chocolate turtles can be a game-changer. Here’s how to nail it:
-
Use a Candy Thermometer: If you want a smooth texture, aim for the soft ball stage (230°F to 240°F). No thermometer? A cold water test is your best friend—droplet should form a soft shape when dropped in water.
-
Avoid Over-Stirring: Stir only until the ingredients come together. Over-stirring can lead to grainy caramel.
-
Patience is Key: Allow the caramel to cool slightly before drizzling over your pecans. This helps it set properly without running all over the place!
Choosing the right chocolate
When it comes to chocolate turtles, the chocolate you choose makes all the difference. Here are some tips:
-
Opt for Quality: Look for chocolate with at least 50% cocoa content. Brands like Ghirardelli or Callebaut provide a rich flavor that pairs beautifully with caramel.
-
Melting Matters: Make sure to melt the chocolate using a double boiler or microwave at low heat to avoid scorching.
Incorporating these tips will ensure your chocolate turtles are not just tasty but truly unforgettable! For more insights on candy-making, check out Serious Eats for expert advice.
Serving suggestions for Chocolate Turtles
Creative presentation ideas
When it comes to serving your chocolate turtles, presentation can elevate their appeal. You might try arranging them in a decorative box or on a stylish platter lined with parchment paper. For a whimsical touch, serve on a bed of crushed nuts or shredded coconut, mimicking a treasure trove! You can place small labels next to each turtle, highlighting key ingredients like caramel or pecans.
Pairing suggestions for chocolate turtles
Chocolate turtles can be enjoyed solo, but pairing them with complementary flavors takes them to another level. Consider serving them with fresh berries for a tart contrast, or a small scoop of vanilla bean ice cream for a rich, creamy balance. Additionally, a hot cup of espresso or a chilled glass of almond milk offers a delightful beverage pairing. For more ideas, check out this food pairing guide that dives deeper into flavor combinations.
Whether you’re hosting a gathering or simply indulging in a treat, thoughtful presentation and pairing can bring your chocolate turtles to life!
Time breakdown for Homemade Chocolate Turtles
Preparation time
Making chocolate turtles is a breeze! You’ll need about 15 minutes to gather your ingredients and prep the pecans and caramel. Lay out your ingredients, and don’t forget to have your chocolate ready for dipping.
Cooking time
The cooking process for your chocolate turtles will take approximately 20 minutes. This includes melting the caramel and chocolate. It’s an easy process, but be sure to monitor the heat to prevent any burning.
Total time
In total, you’re looking at around 35 minutes from start to finish. Perfect for a quick yet impressive treat! If you’re looking for more fun and delicious homemade candy recipes, check out this candy-making guide. Enjoy your journey to creating these sweet delicacies!
Nutritional Facts for Chocolate Turtles
When indulging in chocolate turtles, it’s essential to be mindful of their nutritional content. These delightful treats, made with pecans and rich chocolate, deliver a satisfying mix of flavors and textures.
Calories
A typical chocolate turtle contains around 100–120 calories, making it a perfect sweet treat when you want to satisfy your cravings without going overboard.
Fat Content
Expect about 6–8 grams of total fat in each chocolate turtle, thanks primarily to the pecans. Healthy fats can be good for you, but moderation is key to balancing your diet. For more insights about healthy fats, check out resources from the American Heart Association.
Sugar Content
On average, each turtle carries around 10–12 grams of sugar. While these numbers can add up quickly, enjoying them in moderation won’t completely derail your healthy eating habits. If you’re looking for ways to reduce sugar in your diet, Healthline has excellent tips to help you navigate sugar alternatives without sacrificing flavor.
Whether treating yourself or sharing with friends, knowing the nutritional facts can make your indulgence just a bit sweeter.
FAQs about Homemade Chocolate Turtles
How do I store chocolate turtles?
Storing your chocolate turtles properly is crucial to maintaining their delightful taste and texture. For best results, keep them in an airtight container to prevent air exposure, which can lead to a loss of flavor. Place parchment paper between layers if you’re stacking them. Store them in a cool, dry place away from sunlight, ideally between 65-72°F. Avoid the fridge, as chocolate can develop a white film due to condensation, called “chocolate bloom.”
Can I make chocolate turtles in advance?
Absolutely! One of the best aspects of chocolate turtles is their ability to be prepared ahead of time. You can make them a week in advance. Just follow the recipe as usual, allow them to set completely, and store them in an airtight container. You might even consider freezing them for longer-term storage. Just make sure to separate layers with parchment to prevent sticking. When ready to enjoy them, let them sit at room temperature for a bit—your taste buds will thank you!
What are some creative ways to gift chocolate turtles?
Gifting chocolate turtles can be as fun as making them! Here are a few ideas to inspire your creativity:
- Festive Treat Bags: Package them in cute bags, add labels, and tie with ribbons for a beautiful presentation.
- Personalized Boxes: Use small boxes lined with tissue paper, and consider customizing them for special occasions.
- Themed Gift Baskets: Combine your turtles with other homemade treats or snacks!
For more gift ideas, check out this guide on Creative Gifting. Remember, there’s nothing like sharing your delicious homemade creations!
Conclusion on Homemade Chocolate Turtles
Recap of the Chocolate Turtles Experience
Making your own chocolate turtles is not just about the sweet treat; it’s an entire experience filled with fun and creativity. From melting rich chocolate to arranging crunchy pecans and chewy caramel, each step brings you closer to a delightful indulgence. The joy of presenting your friends and family with these homemade goodies is priceless, transforming a simple treat into a memorable occasion.
Encouragement to Make Chocolate Turtles at Home
Why not take the plunge and try making chocolate turtles in your own kitchen? It’s easier than you might think, and the results are truly worth it. Plus, you can customize them with different nuts or flavors to suit your taste. If you’re looking for inspiration, check out recipes on sites like Serious Eats or Food Network. Embrace the journey, savor the process, and ultimately, enjoy these delightful creations!
PrintChocolate Turtles: Easy Homemade Treats That Delight Everyone
Indulge in the delightful combination of chocolate and caramel with these easy homemade chocolate turtles!
- Prep Time: 15 minutes
- Cook Time: 10 minutes
- Total Time: 25 minutes
- Yield: 24 turtles 1x
- Category: Desserts
- Method: Baking
- Cuisine: American
- Diet: Vegetarian
Ingredients
- 1 cup pecans
- 1 cup chocolate chips
- 1 cup caramel candies
- 1 tablespoon heavy cream
Instructions
- Preheat your oven to 350°F (175°C) and line a baking sheet with parchment paper.
- Arrange the pecans in clusters on the baking sheet.
- Melt the caramel candies with heavy cream in a saucepan over low heat, stirring until smooth.
- Drop spoonfuls of caramel over each pecan cluster.
- Melt the chocolate chips and drizzle them over the caramel-covered pecans.
- Let cool until set before serving.
Notes
- Try adding sea salt on top for an extra flavor boost!
- Store in an airtight container to keep them fresh.
Nutrition
- Serving Size: 2 turtles
- Calories: 150
- Sugar: 12g
- Sodium: 50mg
- Fat: 8g
- Saturated Fat: 4g
- Unsaturated Fat: 3g
- Trans Fat: 0g
- Carbohydrates: 18g
- Fiber: 1g
- Protein: 2g
- Cholesterol: 5mg
Keywords: Chocolate Turtles, homemade treats, chocolate recipes