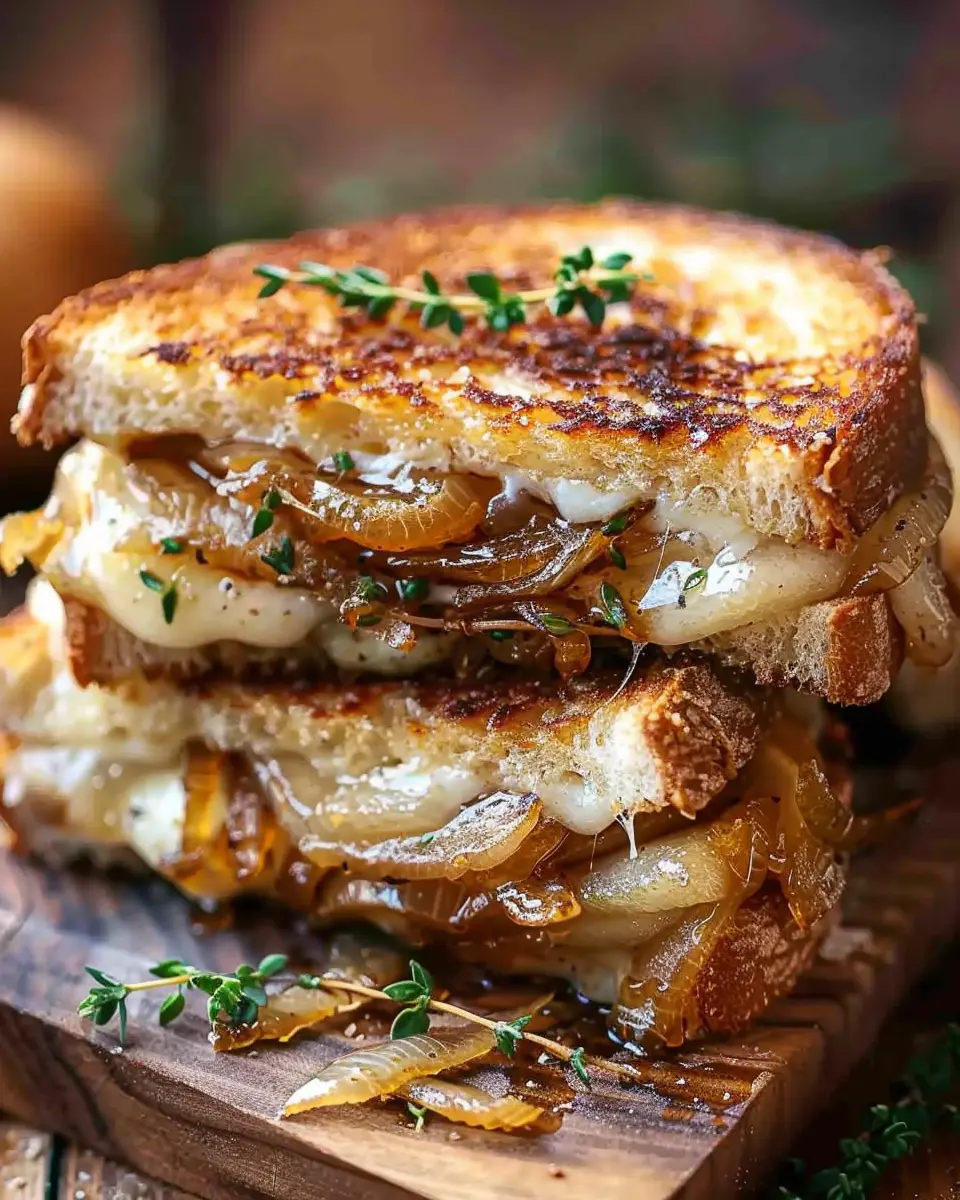
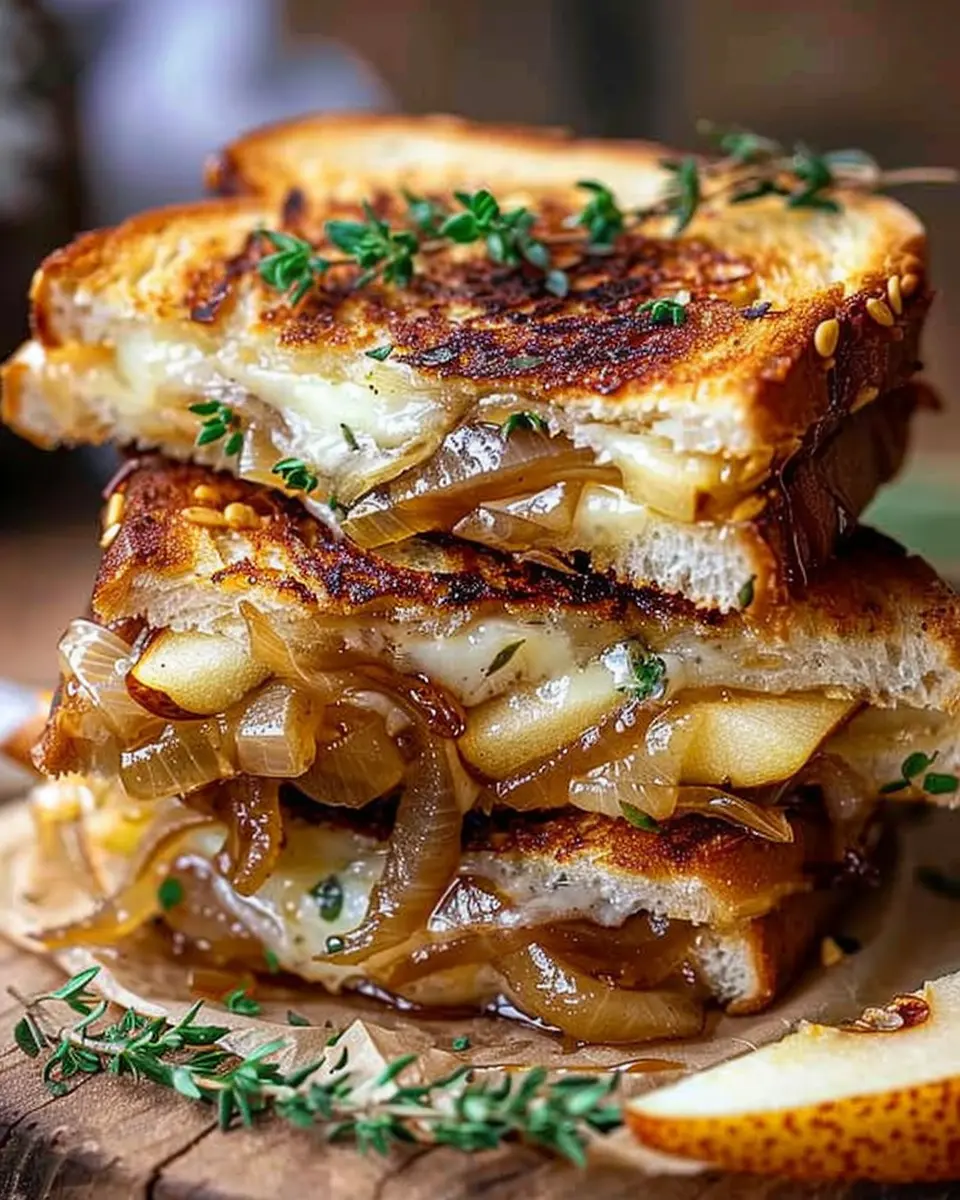
Introduction to Pear & Apple Grilled Cheese
When it comes to comfort food, few things hit the spot quite like a classic grilled cheese sandwich. But have you ever thought about taking your grilled cheese game to the next level? Enter the Pear & Apple Grilled Cheese! This delightful twist on a beloved favorite combines the sweetness of ripe pears and crisp apples with the savory richness of cheese, resulting in a flavor explosion that’s sure to make your taste buds dance.
Why Pear & Apple Grilled Cheese is a Game-Changer
The first time I tried a Pear & Apple Grilled Cheese, I was skeptical. Could fruit really belong in a sandwich? But let me tell you, the combination of juicy fruit and melty cheese was a revelation. The natural sweetness from the pears and apples harmonizes beautifully with the creamy, sharp notes of cheese, creating a mouthwatering contrast that’s hard to resist.
-
Nutritional Benefits: Not only is this sandwich delicious, but it’s also packed with vitamins and fiber from the fruit. Pears and apples are excellent sources of Vitamin C, which supports a healthy immune system (see more about their benefits at Healthline).
-
Perfect for Every Occasion: Whether you’re whipping up a quick lunch at home or looking for a fun dish to impress your guests at a gathering, this grilled cheese fits the bill. It’s quick, easy, and can be adapted to suit various tastes. For example, swapping out your regular cheese for a sharp cheddar or a creamy brie can radically change the flavor profile.
-
Endless Customization: The beauty of this recipe lies in its versatility. Feel free to mix in some turkey bacon or even chicken ham for an extra hearty meal, or play around with spices like cinnamon or nutmeg for a warm, aromatic twist.
In a world often filled with the same old meal options, the Pear & Apple Grilled Cheese is a fresh and delightful choice. Not only does it satisfy your cravings, but it also brings a unique flair to the traditional sandwich, making it a true game-changer in your cooking repertoire. Ready to dive into the recipe? Let’s get started!
Ingredients for Pear & Apple Grilled Cheese
Creating the perfect Pear & Apple Grilled Cheese with Caramelized Onions doesn’t require a long shopping list. Below are the essentials and a few optional additions that can elevate your sandwich game:
Essential ingredients
- Bread: A nice rustic bread or whole grain gives a fantastic texture.
- Cheese: Opt for sharp cheddar or creamy brie for contrast against the sweet fruits.
- Fruits: Fresh slices of juicy pears and crisp apples—Granny Smith or Honeycrisp work wonders!
- Caramelized Onions: Sweet and rich, they add depth to every bite.
- Butter: For that golden, crispy outer layer. You can also use olive oil as a healthier alternative.
Optional flavor enhancers
- Turkey Bacon or Chicken Ham: For those who want a meaty twist, layered perfectly with the sweetness of fruits.
- Honey or Maple Syrup: Just a drizzle on the finished sandwich gives a delightful sweetness.
- Fresh Herbs: Basil or thyme can introduce a fresh, aromatic note.
Experimenting with these ingredients can turn a simple grilled cheese into a quick delight that’s sure to impress! For inspiration on how to use these ingredients, check out resources from Food Network or Serious Eats.
Preparing Pear & Apple Grilled Cheese
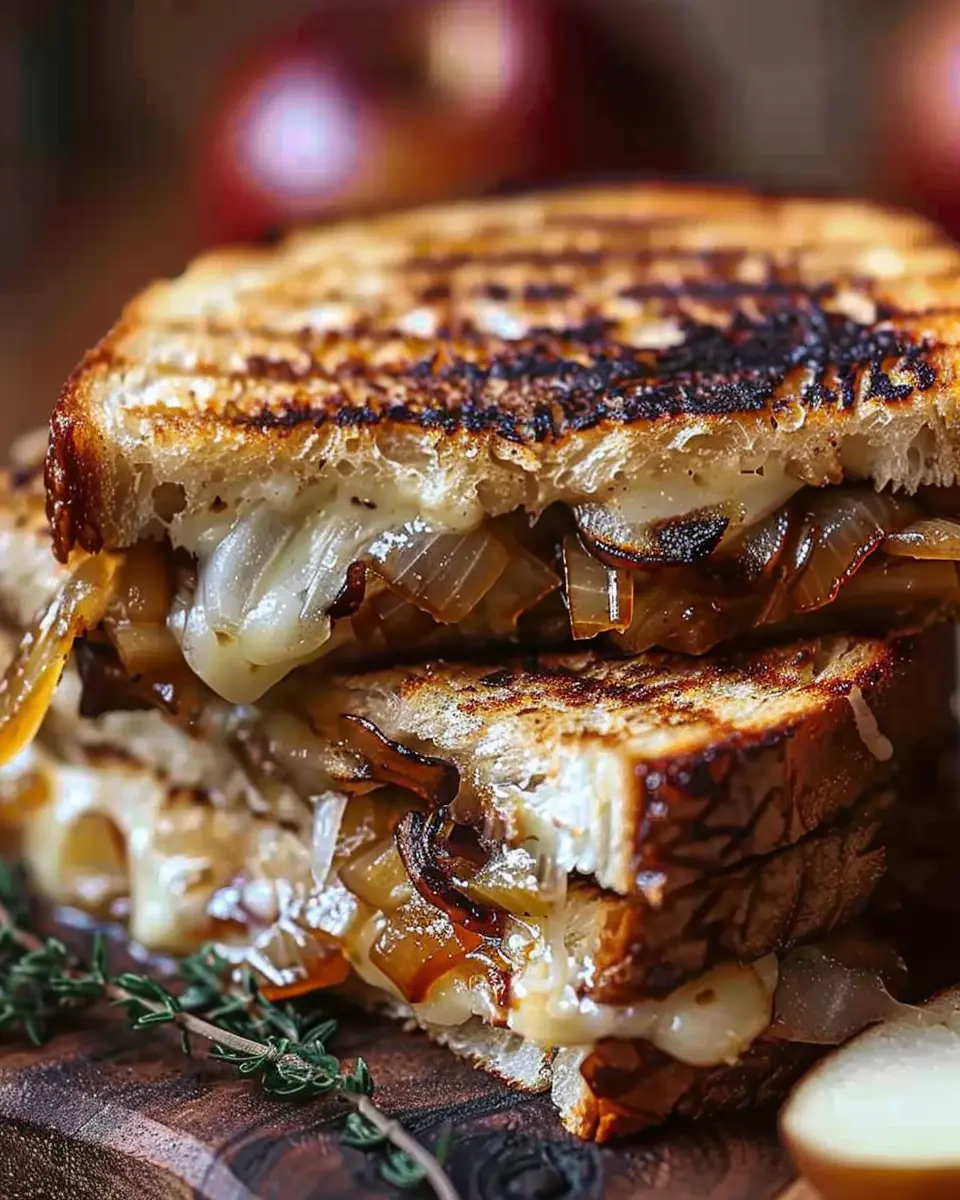
If you’re looking for a quick yet utterly delightful meal, then Pear & Apple Grilled Cheese with Caramelized Onions is exactly what you need. This tasty sandwich combines the sweetness of fresh pears and apples with gooey cheese, all brought together with the rich flavor of caramelized onions. Let’s walk through each step to get you grilling in no time!
Caramelize the Onions
The first thing we need to do is create those beautifully caramelized onions that will add both sweetness and depth to our Pear & Apple Grilled Cheese.
- Ingredients Needed:
- 2 medium-sized onions
- 1 tablespoon olive oil
- A pinch of salt
- Slice the Onions: Start by peeling and slicing your onions thinly. The thinner the slices, the better they will caramelize!
- Heat the Oil: Heat a skillet over medium heat and add the olive oil.
- Add the Onions: Once the oil is shimmering, toss in the sliced onions and sprinkle them with salt. The salt helps draw out moisture.
- Cook Low and Slow: Lower the heat to medium-low and let the onions cook for about 20-30 minutes, stirring occasionally. You want them to become a rich, golden brown color. Patience is key here—caramelization can’t be rushed.
Caramelized onions can be made ahead of time and stored in the fridge. They also add a wonderful touch to a variety of dishes, making them a versatile ingredient for your kitchen.
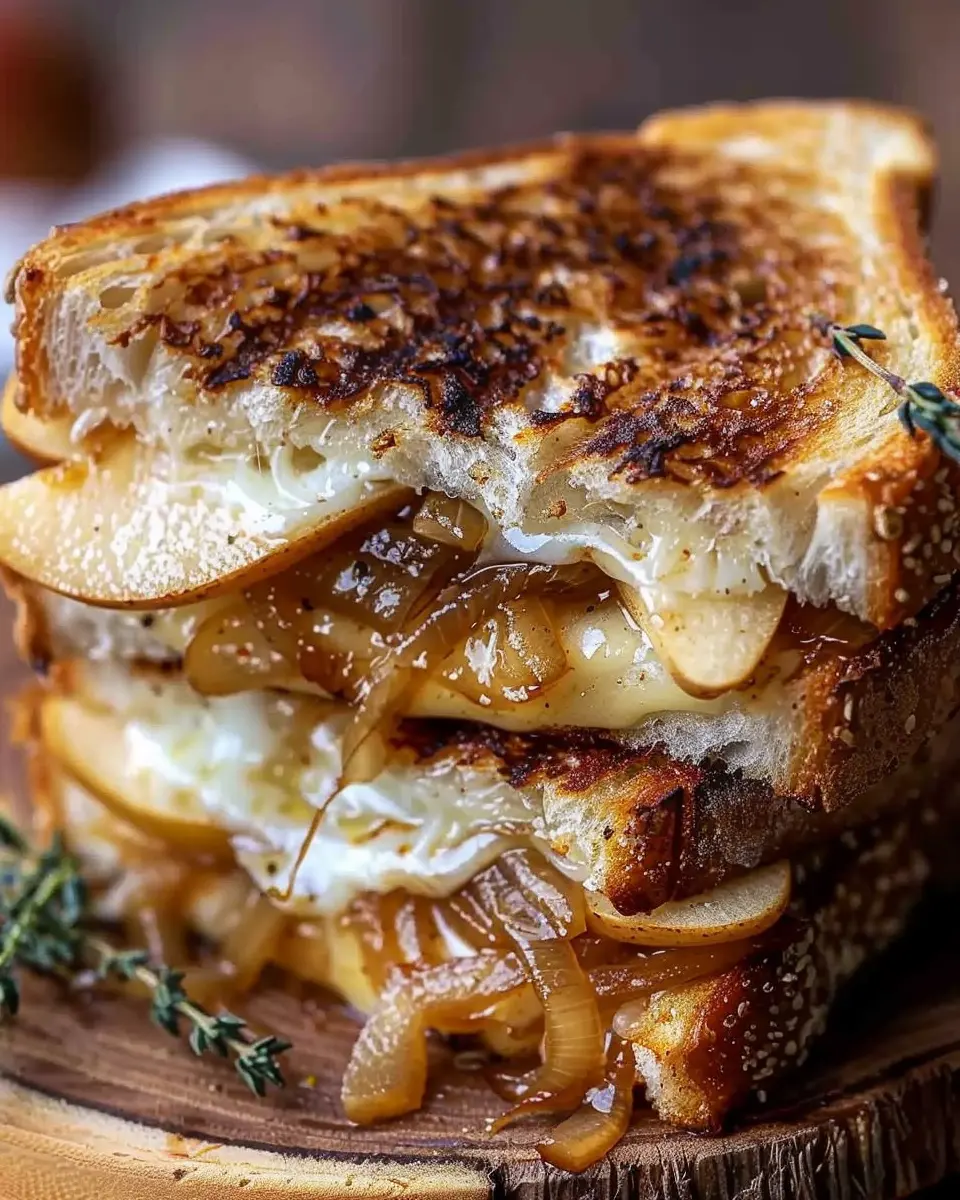
Layer the Cheese and Fruits
Now that your onions are beautifully caramelized, it’s time to assemble this flavor-packed Pear & Apple Grilled Cheese.
- Ingredients You’ll Need:
- Bread of your choice (sourdough or whole grain works well)
- Cheese (go for sharp cheddar or creamy brie)
- Fresh pear, thinly sliced
- Fresh apple, thinly sliced
- Optional: Turkey bacon or chicken ham for an extra protein boost
- Choose Your Bread: Lightly toast your bread if preferred, as this can help prevent it from becoming too soggy when the cheese melts.
- Layering: On one slice of bread, layer your choice of cheese, followed by slices of pear and apple, then add the caramelized onions on top. If you desire more protein, add turkey bacon or chicken ham here too. Finally, top it off with another slice of cheese and close it with a second slice of bread.
This combo is like a party in your mouth! The fruit adds a refreshing crunch that perfectly balances the savory elements.
Grilling the Sandwiches
It’s time to bring everything together with a little grilling.
- Heat the Skillet: Use the same skillet you used for the onions. It should still have some of that flavorful oil, which is perfect for grilling.
- Add Butter or Oil: If you like that rich crispy flavor, spread a little butter or olive oil on the outside of both sandwich slices.
- Grill Away: Place the sandwich in the skillet and grill over medium heat. Cook for about 3-5 minutes on each side until it’s golden brown and the cheese gets beautifully melty. Don’t rush; you want that cheese to ooze!
Make sure to press down gently with a spatula to help it toast evenly.
Serving Your Grilled Cheese
Once your sandwiches are grilled to perfection, it’s time to serve.
- Plating: Cut the sandwiches diagonally for that classic presentation. You can pair them with a side of mixed greens or a light salad for a complete meal.
- Dipping Options: A nice addition is a sweet balsamic reduction or a honey mustard dip for that extra punch of flavor.
Take a moment to enjoy the aroma and colors before digging in. The sweet fruit combined with savory cheese and caramelized onions is simply irresistible. This dish is not just a meal; it’s a culinary experience that you can make in under 30 minutes!
So for your next lunch or dinner, whip up this Pear & Apple Grilled Cheese and indulge yourself in a delightful twist on a classic favorite. You’re sure to impress and satisfy any palate!
If you’d like to see the full recipe, check it out here.
Happy grilling!
Variations on Pear & Apple Grilled Cheese
Grilled cheese is a blank canvas just waiting for your creative touch, and the flavorful combination of pear and apple brings a delightful twist to this classic comfort food. Here are a few tempting variations to elevate your Pear & Apple Grilled Cheese experience.
Elevate Your Sandwich with Turkey Bacon
Want to add a savory crunch to your grilled cheese? Consider turkey bacon! Its salty flavor pairs beautifully with the sweetness of the pears and apples, giving your sandwich an irresistible contrast. Simply cook the turkey bacon until crispy, and layer it into your sandwich. Not only does this add protein, but it also creates a satisfying bite that balances the sweetness of the fruits.
Explore Different Cheeses
The choice of cheese can drastically change the flavor profile of your Pear & Apple Grilled Cheese. While sharp cheddar brings a robust flavor, creamy brie or tangy goat cheese offers a rich and decadent experience. Don’t be afraid to mix and match! Try a blend of gouda and fontina for a gooey, melty texture that contrasts beautifully with the crispy bread. Each cheese adds its unique twist, so experiment until you find your perfect pairing.
Sweet and Spicy with a Dash of Cinnamon
Looking to kick things up a notch? Sprinkle a touch of cinnamon into your grilled cheese mix. This not only enhances the sweetness of the pears and apples but introduces a warm, spicy note. For an even bolder flavor, consider adding a hint of cayenne pepper or chili flakes. This sweet and spicy combo is sure to impress, leaving your taste buds dancing!
For more ideas on enhancing your grilled cheese, check out resources like Serious Eats or Food & Wine. Now it’s your turn to create the ultimate Pear & Apple Grilled Cheese!
Cooking Tips for Pear & Apple Grilled Cheese
Creating the perfect Pear & Apple Grilled Cheese is an art, but with the right techniques, anyone can master it. Here are some friendly tips to guide you through the process.
Tips for achieving the perfect golden crust
- Low and Slow Cooking: Utilize a low heat setting on your stove. This allows the bread to toast evenly while ensuring the cheese melts perfectly without burning the outside.
- Butter or Spread: Generously butter the outside of your bread slices. For a twist, use flavored spreads like garlic butter or herb-infused oils for an extra kick.
- Pressing Down: Consider using a spatula to gently press the sandwich as it cooks. This not only enhances the browning but also helps meld the flavors.
Ways to enhance flavor and texture
- Layering: Start with a base of grated cheese for even melting, followed by thinly sliced pears and apples. A sprinkle of sea salt will enhance the sweetness of the fruit.
- Add Protein: Incorporate Turkey Bacon or Chicken Ham for a satisfying crunch. The savory notes will beautifully balance the sweetness of the fruit.
- Experiment with Cheese: Don’t be afraid to try different cheeses! Soft cheeses like brie or sharp varieties like cheddar can add delightful complexity to your Pear & Apple Grilled Cheese.
For more innovative cooking ideas, check out The Kitchn for inspiration! Remember, cooking should be fun – so get creative with your ingredients and enjoy the delicious results.
Serving suggestions for Pear & Apple Grilled Cheese
Pairing with sides for a complete meal
To elevate your Pear & Apple Grilled Cheese, consider adding some delicious sides that complement its sweet and savory profile. A simple arugula salad, tossed with a light vinaigrette, is a fantastic way to introduce freshness. You might also enjoy sweet potato fries or a bowl of warm butternut squash soup for a comforting touch. Feel free to include favorites like roasted vegetables or crispy kale chips for a delightful crunch.
Creative serving ideas
When it comes to serving your Pear & Apple Grilled Cheese, think beyond the plate! Cut the sandwiches into smaller triangles or pinwheels for a fun brunch or snack option. Stack a few together and serve with toothpicks for a casual gathering—these bites will be a hit! Additionally, serve with a side of homemade apple chutney or peach salsa to add an unexpected twist. You can also find other interesting side options at Food52 that pair perfectly with grilled cheese.
These ideas not only enhance your meal but also make it visually appealing for anyone you’re serving!
Time Details for Pear & Apple Grilled Cheese
Preparation Time
Getting your Pear & Apple Grilled Cheese ready for the skillet takes about 10 minutes. You’ll want to slice your fruits thinly and get your bread and cheese prepped. While that sounds simple, those little seconds make a world of difference in your cooking adventure!
Cooking Time
Once everything’s set, the cooking itself should take around 15 minutes. You’ll want to caramelize your onions gently for a rich flavor before grilling the sandwich to that golden perfection. Trust me, the scent of melting cheese and sweet fruits mingling in your kitchen is absolutely worth the wait.
Total Time
In total, you’re looking at about 25 minutes from start to finish. Perfect for a quick lunch or a cozy dinner. So whether you’re juggling work deadlines or just winding down at home, this quick delight is just around the corner! If you want to dive deeper into the art of grilling, you might check out Serious Eats for some tips that complement this recipe beautifully.
Nutritional Information for Pear & Apple Grilled Cheese
When you’re craving a comforting dish that also packs a punch in the flavor department, the Pear & Apple Grilled Cheese is your go-to. But what’s under the hood? Let’s break down the key nutritional information to help you make informed choices.
Calories
A serving of this delightful grilled cheese typically contains around 400–500 calories, depending on the type of cheese and bread you choose. It’s satisfying without the guilt, especially when you pair it with a fresh salad.
Protein
You’ll find approximately 15-20 grams of protein in this recipe, thanks to the cheese and optional addition of Turkey Bacon or Chicken Ham. This makes for a great post-workout snack or lunch to keep you energized throughout your busy day.
Sodium
Sodium content can range from 600-800 mg, influenced by ingredients like cheese and any additional seasonings. If you’re watching your sodium intake, consider using low-sodium cheese options or adding fresh herbs for flavor without the extra salt.
For more health tips, you can check out Nutrition.gov for helpful resources on managing your dietary needs. Happy cooking!
FAQs about Pear & Apple Grilled Cheese
Can I use other types of bread?
Absolutely! While a classic sourdough or whole grain works wonders for this Pear & Apple Grilled Cheese, feel free to get creative. A crusty baguette, rye, or even gluten-free bread can elevate your sandwich experience. Just keep in mind that the bread’s texture will influence the overall crunch and flavor, so choose one you love or have on hand.
How can I store leftover sandwiches?
If you’re lucky enough to have leftovers, store them in an airtight container in the fridge. This will help retain the freshness of the Pear & Apple Grilled Cheese. Reheating in a skillet on low heat will bring back that wonderfully crispy exterior while warming up the gooey filling. You can also try wrapping them in foil and placing them in the oven at a low temperature for about 10–15 minutes.
What are good side dishes to serve with this sandwich?
Pairing your Pear & Apple Grilled Cheese with the right sides can take your meal up a notch. Some great options include:
- Mixed greens salad with a light vinaigrette
- Sweet potato fries for a flavorful crunch
- Tomato soup for a classic comfort food combo
- Apple slices sprinkled with cinnamon for a fresh, crisp option
Experiment with these suggestions, and you might find your perfect combinations! Plus, serving a side of fruit can add a nice balance to the richness of the sandwich.
For more serving ideas, check out resources like EatingWell or Bon Appétit for fresh inspiration!
Conclusion on Pear & Apple Grilled Cheese
In conclusion, the Pear & Apple Grilled Cheese with Caramelized Onions is not just a meal; it’s an experience that delights the senses. The fusion of sweet fruits with savory cheese creates a satisfying dish that appeals to young professionals looking for quick yet gourmet options. If you’re in a hurry, this recipe allows for customization—swapping in Turkey Bacon or Chicken Ham adds a protein-packed twist. Plus, the easy-to-follow steps mean you can whip it up any time. For more delicious variations, explore different cheeses like Brie or Gouda to truly elevate your grilled cheese game!
PrintPear & Apple Grilled Cheese: An Easy Delight with Caramelized Onions
A delicious combination of sweet pears and apples, melty cheese, and caramelized onions, perfect for a quick meal.
- Prep Time: 10 minutes
- Cook Time: 10 minutes
- Total Time: 20 minutes
- Yield: 2 servings 1x
- Category: Sandwich
- Method: Grilling
- Cuisine: American
- Diet: Vegetarian
Ingredients
- 2 slices bread
- 1 tablespoon butter
- 1/2 cup shredded cheese
- 1/2 pear, thinly sliced
- 1/2 apple, thinly sliced
- 1/4 cup caramelized onions
Instructions
- Heat a skillet over medium heat.
- Spread butter on one side of each slice of bread.
- Place one slice in the skillet, butter side down.
- Layer cheese, pear, apple, and caramelized onions on top.
- Top with the second slice of bread, butter side up.
- Cook until golden brown, about 3-4 minutes, then flip and cook the other side.
- Once both sides are golden and the cheese is melted, remove from heat and slice.
Notes
- For extra flavor, add a pinch of cinnamon on the apples.
- Use your favorite type of cheese for a unique twist.
Nutrition
- Serving Size: 1 sandwich
- Calories: 300
- Sugar: 10g
- Sodium: 300mg
- Fat: 15g
- Saturated Fat: 8g
- Unsaturated Fat: 5g
- Trans Fat: 0g
- Carbohydrates: 35g
- Fiber: 2g
- Protein: 10g
- Cholesterol: 30mg
Keywords: Pear & Apple Grilled Cheese, Caramelized Onions, Quick Delight